Posts

CGDI CG201 Activation, Odometer Correction & Software Update Guide

Image
The CGDI CG201 Mileage Correction Tool is designed for quick and efficient odometer correction and dashboard service operations. Before using the device, you need to activate it and keep the software up to date. Follow the simple steps below. Device Activation Step 1: Power On the Device Connect the CG201 to a computer via a USB cable, or to a vehicle's OBD-II diagnostic port using the OBD main cable. Step 2: Activate the Device When using the device for the first time, online activation is required. On the home screen, tap Authorization. Select Device Sync. Wait for the activation process to complete. Once activated, all device functions will be available. Odometer Correction To perform odometer correction: Connect the CG201 dedicated OBD main cable to the vehicle's OBD II diagnostic port. Select the correct vehicle model. Follow the on-screen instructions to complete the odometer correction process. Software Upgrade Keeping your CG201 up to date ensures the latest vehicle c...

How to Update CG Monster G08 Key Cutting Machine Online via Wi-Fi

Image
Keeping your CG Monster G08 Key Cutting Machine updated ensures you always have access to the latest features, improvements, and bug fixes. This guide shows you how to connect your device to Wi-Fi and perform an online software upgrade in just a few simple steps. Step 1: Connect the CG Monster G08 to Wi-Fi Before updating the software, make sure your machine is connected to a stable Wi-Fi network. 1. On the Home page or the Version Update page, tap the Wi-Fi icon to enter the Wi-Fi settings. 2. Follow the on-screen instructions to connect to your wireless network. 3. Once the connection is successful, the Wi-Fi icon will indicate that the device is connected. Step 2: Perform an Online Software Update After connecting to Wi-Fi, you can check for the latest software version. 1. Return to the Home page and tap Update. 2. The system will automatically check the latest version on the server. If a new version is available, the version information will be displayed in red. If the text remain...

CG201 V036 Update: New Ford & Fiat One-Click OBD Mileage Correction Support

Image
The latest CG201 V036 software update is now available, bringing expanded vehicle coverage for one-click OBD mileage correction. This release adds support for a wide range of Ford and Fiat dashboard systems, allowing technicians to perform mileage adjustment directly through the OBD port on supported vehicles. New Ford OBD Mileage Correction Coverage The V036 update adds support for the following Ford dashboard systems: * Ford Endeavour 2015 (Dual-Screen) * Ford Mondeo 2015 (DENSO) * Ford Explorer (TRAC) 2011 * Ford Navigator 2011 * Ford Mondeo 2007-2010 Monochrome * Ford S-MAX 2011-2013 Monochrome Type 2 * Ford S-MAX 2007-2010 Type 1 * Ford Explorer (TRAC) 2017 Type 1 * Ford MKZ 2017 * Ford Navigator 2017 * Ford Mondeo 2011-2013 Color Screen (2-Pointer) * Ford Mondeo 2011-2013 Monochrome * Ford S-MAX 2011-2013 Monochrome Type 1 All listed models support direct OBD operation. New Fiat OBD Mileage Correction Coverage The update also expands support for numerous Fiat vehicles, including...

Pre-order CGDI BMW Solder-Free Adapter for BDC2, BDC3& U-Chassis/BCP

Image
The highly anticipated CGDI BMW Solder-Free Adapter is now officially available for pre-order. This specialized hardware suite is designed to streamline the key-matching process for BMW BDC2, BDC3, and the latest U-Chassis/BCP systems by eliminating the need for complex soldering. Optimized Workflow for Professional Locksmiths The CGDI BMW BDC2/BDC3/BCP Adapter provides a practical and reliable alternative to traditional wire-bonding methods. By focusing on stability and ease of use, this tool helps technicians maintain high success rates while minimizing the physical risks associated with PCB modification. Key Functional Advantages To maximize efficiency and protect client hardware, the CGDI adapter incorporates several technical refinements: 1. Non-Invasive Connection Logic: The "clip-and-read" design eliminates the need for soldering irons, preventing accidental short circuits or heat-related damage to the original board.   2. Precision Alignment for BMW Keys: Each adap...

CGDI CG201 ODO Tool: Hyundai/Kia NEC & Genesis 2021 GV80 OBD Update

Image
CGDI has officially released the V028 software update for the CG201 Mileage Correction Programmer . This latest version enhances its capability for professional mileage adjustment and immobilizer services, specifically targeting newer Hyundai and Kia models via OBD. What’s New in V028? The V028 update brings powerful OBD-based solutions for several popular vehicles, eliminating the need to remove the dashboard for many procedures. Key Support List (OBD Mode): HYUNDAI/AZERA 2015-NEC+24C16 by OBD HYUNDAI/AZERA NEC by OBD HYUNDAI/ELANTRA NEC by OBD HYUNDAI/GENESIS 2021 GV80 by OBD HYUNDAI/I20 Type 1 by OBD HYUNDAI/I20 Type 5(NEC) by OBD HYUNDAI/VELOSTER NEC by OBD KIA/ACCENT 2011- NECEC by OBD KIA/CEED 2011- NEC by OBD KIA/MORENTIS 2015- NEC+24C16 by OBD KIA/SPORTAGE 2011- NEC by OBD Why Choose CGDI CG201? The CGDI CG201 is a professional-grade handheld tool designed for technicians who require speed, safety, and accuracy. OBD Operations: Perform mileage correction and IMMO tasks direc...

Using CGDI FC200 and FC200 DAP Adapter to Read a Toyota ECU

Image
This guide demonstrates the process of reading a Toyota ECU using the CGDI FC200 tool and the FC200 DAP adapter . Connection Steps: 1. Connect the adapters in the correct sequence. 2. Refer to the wiring diagram and connect all pins accordingly. 3. Connect the device to a USB port and power supply. 4. Connect the host cable to the adapter, with the other end attached to your computer. 5. All connections are now complete. Software Operation: 1. On your computer, open the FC200 software and enter the specific ECU model. 2. Click "Connect." Once the connection is successfully established, proceed to read the Pflash memory. 3. After saving the data, the task is complete. For a visual walkthrough, please refer to the video guide: Tools available at: www.obd2shop.co.uk

How to Use CGDI K2: Easy Setup & Key Programming Guide

Image
The CGDI K2 is a versatile remote key programmer that generates, copies, and reprograms car keys and remotes. Follow this simple guide to get started. 1. First-Time Setup (1) Press and hold the power button to turn on. (2) Connect to Wi-Fi to activate the device and update software/firmware. (3) Log in to your CGDI account, or create one if you don't have one. 2. Basic Controls (1) Short-press the power button: turns the screen on/off. (2) Hold the power button for 5 seconds: forces a shutdown. (3) Device auto-shuts down when battery is below 5%. (4) Charge using a 4.5V–5.5V/1A charger and Type-C cable. Main Functions 1. Generate Wireless Remote ① Go to Remote Generation from the home screen. ② Select your car model. ③ Connect the remote to the device using the programming cable. ④ Choose Wired Generation and confirm. 2. Generate Smart Remote ① Select the car model. ② Place the CG Smart Key on the device coil. ③ Click Generate Remote and wait for completion. 3. Frequency Detectio...

CGDI A2 Quick Start Guide: IMMO Matching Device Setup

Image
The CGDI A2 is a durable, user-friendly anti-theft matching device designed for locksmiths. It features advanced key programming and communication capabilities for automotive applications. This is a quick start guide for newbies. Configuration Sunlight-readable LCD touchscreen Multi-functional indicator lights (power, charging, low battery alerts) Infrared & key communication slots (supports Mercedes-Benz infrared keys) Versatile ports: DB15, Mini-USB (for software updates), and DC 12V power interface Rubber protection sleeve for durability Operation Guide Tips: Make sure the CGDI A2 IMMO Matching Equipment is connected to the Internet and has sufficient power or is connected to a charger. 1. Press and hold the [Power/Lock] button to turn on the CGDI A2 comprehensive anti-theft matching equipment . 2. When you use the equipment for the first time, you need to connect the equipment to the Internet and activate it so that the function can be used normally. Click the [Authorizat...

CGDI K2 Key Programmer Update Plan: August 18, 2024

Image
This is the latest upgrade plan for CGDl K2 Remote Key Programmer . Update time: August 18, 2024 Update functions: 1. Remote control generation adds 207 smart card models; 2. Add remote control mall function; 3. Add ignition coil detection model function; 4. MCU programmer adds PCF7961 and PCF7922 models; 5. Add Honda, Buick, MQB, and Porsche key readings; 6. Add BMW CAS3 key mileage calibration function. List of 207 smart card models: GREATWALL H6 KeylessGo ID4A 433M ASK GREATWALL Dog KeylessGo ID4A 433M ASK GREATWALL Tank300 City ID4A 433M ASK NISSAN 2016-2018 Altima KeylessGo ID4A(trunk:02) JEEP Renegade(2014+) KeylessGo ID4A 433M GEELY X3 ID46 MG KMD MG6 ID47 MG KMD ZS ID47 NISSAN MarchKeylessGo ID46 433M NISSAN 2007-2012 Rouge KeylessGO ID46 NISSAN 2013-2019 VERSA KeylessGo ID46 315M INFINITI 2009-2012 EX35 KeylessGo ID46 315M INFINITI G25x KeylessGo ID46 315M LATER RETROFIT FUZIK V1-V3 LATER RETROFIT ZX TYPE1 LATER RETROFIT ZX TYPE2 LATER RETROFIT ASD LATER RETROFIT QB GREATWALL ...

CGDl K2 Remote Key Programmer Upgrade Plan

Image
This is the latest upgrade plan for CGDl K2 Remote Key Programmer . Upgrade time: August 2024 (between 12th and 16th) Upgrade functions: 1. Add 204 smart card models for remote control generation; 2. Unlock and reset the key, and add 76 models; 3. Add BMW EWS/1/2/3 /4, BMW CAS1/2/3 key charging function; 4. Add BMW cas4 key KM modification function; List of 204 smart card models: ACURA TL ID46 ACURA 2013 RDX ID46 ACURA 2016-2018 ILX ID47 ACURA 2014-2018 MDX ID47 ACURA 2016-2018 RDX ID47 ACURA 2016-2018 RLX ACURA 2015-2017 TLX ID47 ACURA ILX(2019+) ID47 AUDI AUDI MQB Fold(Keyless Start) AUDI AUDI MQB KeylessGO 315M V2 AUDI AUDI MQB KeylessGO 315M V1 AUDI AUDI MQB Fold(Keyless Start) AUDI AUDI MQB KeylessGo AUDI AUDI MQB Fold(Keyless Start) AUDI Q3 A1 ID48 8X0837220E V1(Keyless Start) AUDI A1 ID48 V2 AUDI Q3 ID48 8X0837220E V2(Keyless Start) AUDI Q3 ID48 KeylessGO 315M AUDI A1 Q3 ID48 8X0837220D(Keyless Start) AUDI A1 Q3 ID48 KeylessGO 434 BAIC MOTOR BJ40L KeylessGo ID46 BAIC MOTOR BJ20...

How to Unbind CG100 and CG100X Accounts

Image
This guide will walk you through the process of unbinding your CG100 and CG100X accounts. 1. CG100 Account Unbinding Instructions ① Access Device Association Click on the icon shown below. This will display your account binding information. Select "Unbind Current Device" in the bottom left corner. ② Confirm Unbinding A dialog box will appear. Enter your account password and click "Confirm."  The device will be successfully unbound. ③ Restart the Software This is a crucial step. Make sure to exit the software and reopen it. At this point, you should see that no account information is present. 2. CG100X Account Unbinding Instructions ① Access Device Association Click on the icon shown below and select "Associated Devices." You will see your account binding information. Then click on "Unbind Current Device." ② Confirm Unbinding Enter your account password and click "Confirm." The device will be successfully unbound. ③ Restart the Softw...

(Solved) CGDI CG Pro Can't Write Mileage on 35160WT EEPROM

Image
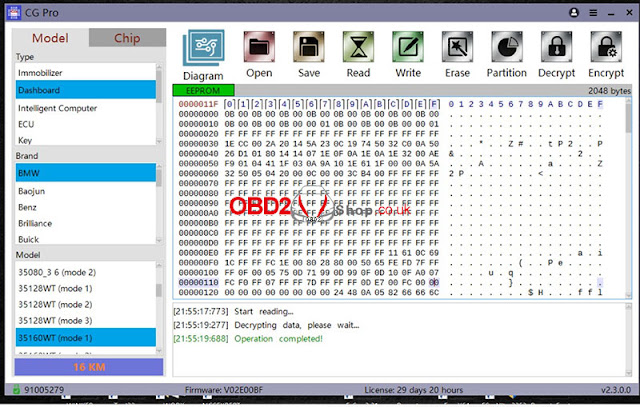
Customer's problem: I bought 10/2023 Cgpro v2.2.0.0 from you, I have issues with my device I cannot write mileage on 35160wt EEPROM, and it seems to not be able to initialize the device properly before writing new data to EEPROM. Is it possible to file a complaint about this to you? I even just tried increasing mileage by 2000km and trying to write backup Again, the same issue. Initialization error after 25 mins at 95%. Is new status, after messing around with it I can only read 16km dump out of my EEPROM. When it's soldered to the cluster it shows a mileage of 45019km. It looks like it cannot read the EEPROM any longer either..... Solution: Chip heating or replacing the spare chip. 35160WT erasing heating method instructions (if the chip cannot be erased, you can try it): Before operation, adjust the air gun to 100°C and heat the chip for 20 to 30 seconds (the chip is soldered to the board). After that, stop heating and put it on immediately to try the operation. After waitin...